
Toy Injection Mold Development: A Buyer’s Guide for Educational Products
Practical decisions for turning a custom housing into production tooling without losing control of function, safety, finish or ownership.
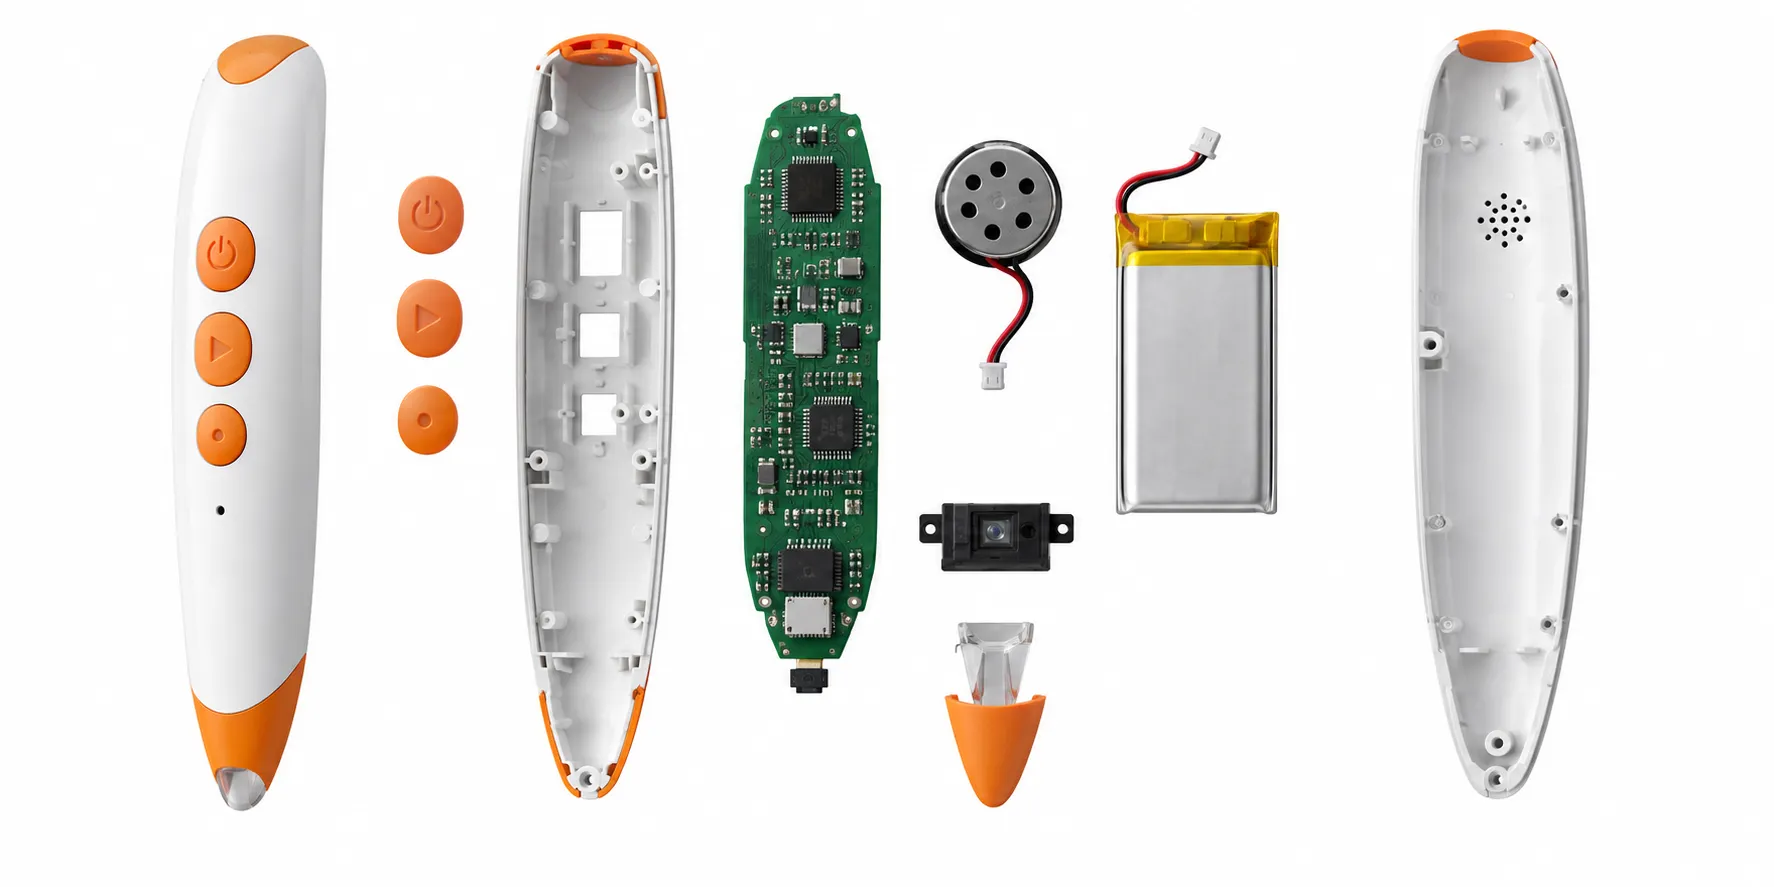
A new injection mold gives an educational toy a distinctive shape, but it also converts design assumptions into steel. Button feel, speaker openings, battery access, sensor alignment, screw bosses, wall thickness and assembly sequence can become expensive to change after tooling begins. The buyer should therefore treat mold release as an engineering gate, not a styling milestone.
Tooling cost depends on more than product size. Part count, geometry, undercuts, actions, surface texture, steel selection, cavity count, tolerance, expected life and required fixtures all influence the proposal. A low quotation may exclude mold-flow work, trial rounds, texture, spare inserts, gauges or maintenance.
This guide explains what evidence should exist before release, how trials are evaluated and how ownership and maintenance are documented. It does not prescribe a mold design; the factory and tooling specialists must review the actual product, materials, production volume and safety requirements.
What should buyers control in toy injection mold development?
Buyers should control the released 3D design, material, finish, parting and assembly requirements, DFM review, mold specification, ownership terms, trial criteria, correction records, approved molded samples and maintenance plan. Tooling should not begin until internal components, battery access, controls, safety considerations and production quantities are sufficiently stable.
The mold is one part of a complete manufacturing system. A well-made tool can still produce an unsuccessful toy if the housing traps sound, misaligns the sensor, weakens screw bosses or makes assembly difficult. Review the product in assembled use, not only as separate plastic parts.
Define who makes the tool and where it will run. A mold built by a subcontractor but owned or managed by the assembly factory needs clear identification, trial access and records. If future transfer matters, confirm machine compatibility, documentation and practical transfer conditions before payment.
Use staged payments tied to evidence rather than calendar dates alone. Typical gates may include design release, tool construction, first trial, correction approval and accepted production-intent samples. Commercial terms should reflect the actual agreement and local legal advice.
1. Freeze the product architecture before releasing steel
Confirm PCB, speaker, battery, charging connector, optical module, buttons, indicators, fasteners and wiring paths. Maintain clearances for tolerance and assembly. A placeholder electronic layout is not enough when those components determine bosses, vents, windows and structural ribs.
Review foreseeable use. Children may drop, twist, press, mouth or pull the product differently from an adult engineer. Battery doors, small parts, accessible edges and openings require product-specific safety review. Design changes from risk assessment should happen before tooling whenever possible.
Prototype the critical interaction. Use 3D printing or other models to review grip, reach, button spacing, pen tip angle and package fit. Prototype material does not prove production strength, but it can expose ergonomic or spatial problems before they become tooling corrections.
2. Use DFM to connect appearance with stable molding
Design for manufacture reviews wall thickness, draft, ribs, bosses, undercuts, gates, ejectors, parting lines, sink risk, weld lines, warpage and cosmetic surfaces. The factory should mark proposed changes on the model and explain their effect on appearance, assembly and function. The buyer should approve the final geometry revision used for tooling.
Surface texture and color interact with geometry. Deep texture may require additional draft. High-gloss surfaces reveal flow and sink. Light-colored materials can show contamination or color variation. Approve a finish direction and identify A-surfaces, hidden areas and allowable tool marks.
Part consolidation can reduce assembly, but it may complicate the mold or repair. Separate buttons, windows or speaker covers may improve function and color flexibility. Evaluate total product cost, not only part count or tooling price.
| DFM item | Product consequence | Approval evidence |
|---|---|---|
| Gate and weld location | Appearance and local strength | Marked drawing and trial review |
| Boss and rib design | Assembly strength and sink | Section review and molded-part inspection |
| Draft and texture | Release, finish and dimensional control | Texture reference and final CAD |
| Parting and ejectors | Visible lines and marks | Cosmetic-zone agreement |
3. Specify the tool, not only the molded part
A tooling quotation should identify part list, mold dimensions, cavity count, material or steel approach, expected production use, runner system, actions, inserts, texture, trial rounds, included samples and maintenance assumptions. The appropriate specification depends on volume and factory equipment; avoid selecting steel grade from a generic checklist without toolmaker input.
Confirm whether gauges, fixtures, spare inserts or wear components are included. Buttons, battery-door features and optical windows may need tighter functional control than broad cosmetic surfaces. Define critical dimensions and the measurement approach before trials.
Give every mold and cavity an identifier. Record tool location, ownership plate, drawing revision and maintenance history. This improves traceability when parts from different cavities show different fit or appearance.
4. Evaluate mold trials as engineering evidence
The first trial shows how the design and tool behave; it is rarely the final appearance standard. Review fill, dimensions, warpage, sink, flash, short shots, parting lines, ejector marks and fit. Assemble real components and test buttons, fasteners, battery access, sound and sensor alignment.
Keep a correction list tied to photos, measurements and CAD revision. Identify whether each issue needs process tuning, tool correction, material change or product redesign. Do not mask structural problems with hand finishing on approval samples.
Later trials should confirm that corrections solved the issue without creating another. Use production-intent resin and color as the project advances. Where texture is applied after basic geometry approval, retain an untextured stage if needed to complete corrections first.
5. Validate molded assemblies, not isolated shells
Build production-intent units across cavities and trial conditions. Check gaps, steps, screw torque, clips, button feel, connector access, speaker output and optical recognition. A dimension can meet drawing tolerance while the tolerance stack produces poor assembly, so evaluate the complete product.
Run appropriate reliability and safety preparation based on risk and market. Drop, impact, torque, tension, battery access, sharp points, temperature or other evaluations may be relevant. Qualified laboratories and compliance professionals should define applicable formal testing; factory engineering checks support development but do not replace it.
Approve color and surface using controlled references. Variations between resin lots, molded parts, painted parts and printed graphics should be reviewed together. Packaging inserts must hold the final geometry without damaging cosmetic surfaces or pressing controls during transport.
6. Document ownership, use, storage and maintenance
An invoice marked 'mold fee' does not automatically answer ownership. The agreement should identify the tool, payer, legal owner, permitted products and customers, storage location, unauthorized-use restrictions, maintenance responsibility and conditions for transfer or disposal. Obtain appropriate legal advice for the commercial relationship.
Define what happens when the tool is idle or worn. Storage conditions, corrosion protection, trial frequency and repair approval affect future availability. Confirm whether routine maintenance is included in part price and how major repairs or design changes are quoted.
If the mold may transfer, identify delivered records and physical interfaces. A tool designed around one factory's machine, hot runner, fixtures or automation may not move easily. Practical transferability should be evaluated, not assumed from ownership wording alone.
7. Control molded parts during mass production
Approve first articles from the production tool and intended material before the complete run. Inspect critical dimensions, appearance and assembly. Where multiple cavities exist, identify and sample each cavity. Component labels or process records should support traceability when defects cluster.
Monitor color, flash, warpage, sink, contamination and wear. Define responses for process drift and segregate nonconforming parts. Regrind use, material substitutions or process changes should follow the approved specification and change-control process.
Shipment inspection should assess the finished toy, but incoming and in-process controls detect molding problems earlier. Maintain approved molded samples and assembly references at the line. A clean final shell cannot compensate for hidden boss damage, loose fasteners or sensor misalignment.
A buyer's tooling review from DFM to production maintenance
Review the part as a manufactured system
During design for manufacture, review wall thickness, ribs, bosses, snap fits, screw columns, draft, parting lines, gates and ejector locations together. A change that strengthens one boss may create sink on a visible surface; moving a gate may improve appearance but complicate flow. Use marked drawings and predicted risks so aesthetic and engineering owners approve the same geometry.
Confirm resin family, color method, texture and any soft-touch or painted areas. Material shrinkage and finish affect dimensions and assembly. Electronics clearances, button travel, speaker sealing and battery access should be checked in the complete stack. The mold is not successful merely because individual plastic parts can be ejected.
Use trial data to close problems
For each tool trial, record machine, resin, color, process conditions, cavity, measurements and defects. Compare short shots, weld lines, flash, warpage, sink, texture and color against agreed zones. Assemble enough samples to reveal fit and functional variation. A polished presentation sample selected from a trial does not describe the process window.
Corrections should distinguish tool steel changes, parameter optimization and part-design changes. Protect critical dimensions after they are achieved and remeasure areas affected by rework. When several cavities exist, approve cavity-to-cavity performance rather than averaging all samples. Link the final tool-trial report to the approved part revision.
Clarify ownership, storage and maintenance
The commercial agreement should identify the tool, paid scope, ownership, permitted use, storage site, expected life assumptions, maintenance responsibility and transfer conditions. Mark tools and major inserts with project identification. If family molds serve multiple parts, document how ownership and future changes work.
Production control should include preventive maintenance based on shots and condition, repair records and controlled replacement of wear components. Ask how the factory protects the tool between orders and verifies it before a reorder. A mold is a long-term production asset; maintenance history and current condition are part of supply continuity.
Frequently asked questions
How much does a toy injection mold cost?
Cost depends on part size, count, geometry, cavities, actions, steel, finish, expected use, fixtures and trial scope. Request a tool specification and product breakdown rather than a generic range.
Can tooling start before electronics are final?
It is risky when component size, position, connector, speaker, battery or controls affect the housing. Freeze critical interfaces and document any remaining assumptions before release.
What is a T1 mold sample?
T1 commonly refers to the first tool trial, but terminology varies. It is an engineering evaluation of the new mold and is not automatically a final approved production sample.
Who owns a custom toy mold?
Ownership depends on the written commercial agreement and applicable law. Document the identified tool, use restrictions, storage, maintenance, transfer and disposal rather than relying on payment alone.
Why inspect parts from every mold cavity?
Different cavities can produce different dimensions or cosmetic defects. Cavity identification helps isolate variation and corrective action.
Does a successful mold trial mean the toy is production-ready?
No. The assembled product, materials, electronics, firmware, content, reliability, packaging and applicable compliance still require appropriate approval and pilot validation.
Conclusion
Toy injection mold development succeeds when industrial design, electronics, safety, assembly and production controls are resolved before steel locks them together. A disciplined DFM and trial process turns visual intent into repeatable molded parts.
Protect the investment with clear ownership, records and maintenance. Approve the complete assembled educational product, not isolated shells, and preserve traceability from tool revision and cavity to finished shipment.
Authoritative references
Requirements change and differ by product. Use the current official source and qualified professional advice for the final project.